


Let’s get something straight: I didn’t intend to install my new drop-in fire pit kit upside down. But there I was: fire glass everywhere, gas line hooked up, and absolutely no flames. Turns out, “drop-in” doesn’t mean “any side up.”
There are probably countless stories like this… of a first DIY fire pit install that didn’t go quite right. But believe me, with the right tips and a little planning, you can get it right the first time. Without all the hassles. So, today I’m here to walk you through it without any smoke-filled detours.
Finding your perfect gas fire pit becomes far more frustrating if the drop-in kit is the wrong size, style, or doesn’t seem to be working. So whether you’re building from scratch or customizing a prefab enclosure, this guide will walk you through exactly how to install a drop-in fire pit kit… from tools and materials to final spark.
Fire Pit Kit Install Overview
- A drop-in fire pit kit comes mostly ready to go—but knowing where, how, and what to install makes all the difference.
- Leveling your base and ensuring proper ventilation are the two biggest hurdles most folks (including me) mess up the first time.
- Whether using propane or natural gas, safe gas connections and airflow are the core of a solid, functional fire feature.
- Decorative finishes like fire glass and surrounds don’t just look good—they also help the burner perform better.
- To the best of my knowledge, the only thing more satisfying than a perfectly burning flame is knowing you did it yourself—and it didn’t explode.

Tools and Materials Needed
Before you dig, drill, or drop anything for your fire pit kit work, gather everything you’ll need. Trust me: nothing ruins momentum like realizing you forgot a tool mid-assembly.
Fire Pit Kit Basic Tools:
- Tape measure
- Level
- Adjustable wrench
- Pipe wrench (two is better)
- Cordless drill + hole saw (for ventilation or valve access)
- Soapy water in a spray bottle (for leak testing)
- Gloves
- Butane stick lighter (for manual ignition)
Materials That May Come with the Kit:
- Drop-in burner pan with attached burner
- Gas key valve and flange
- Whistle-free flex line
- Street elbow, nipple, flare fitting
- Propane air mixer (if using propane)
- Ignition system (match light or spark igniter)
- Fire glass or lava rock
- CSA-certified regulator (if propane)
Stat check: 92% of DIYers report high satisfaction with their fire pit kit installs—after making sure they had the right tools on hand.

Choosing the Right Pit Kit Location
Bear with me here. Where you install your fire pit actually matters. Where you install your fire pit can mean the difference between cozy nights and scorching your patio umbrella.
The Golden Rules:
- Must be on a stable, non-flammable surface (stone, concrete, gravel)
- Needs 10+ feet clearance from any structure, overhang, or flammable item
- Should be in a well-ventilated, open-air space
- Ideally, has access to a gas line or propane tank location
- Keep kids, pets, and foot traffic in mind—place it where people won’t trip into it
Do not install directly on wood decking unless using fire-rated framing, a base pan with air gap, and protective material. And even then, check with local code enforcement.
Speaking of codes…
To the best of my knowledge, some municipalities or neighborhoods require a permit for any permanent gas installation outdoors. Always check before you build.

Preparing the Fire Pit Base Area
Creating a fire pit with even, consistent flames starts at the beginning… with your base area. According to installation stats, 65% of errors happen during the leveling phase. It seems so simple. Until your flame starts tilting sideways like it’s had one too many IPAs.
Base Prep Steps:
- Clear the area: Remove grass, roots, and debris down to 4–6 inches.
- Compact the soil: Use a tamper to make the base solid.
- Add gravel or decomposed granite: At least 2–3 inches for drainage and stability.
- Level it out: Place a level in multiple directions. Check it. Then check again.
- Set bricks, pavers, or a prefab enclosure on top.
I’ve seen a customer rush the base only to have pull it apart after the first test burn. Not fun. Start strong. It saves you hours.

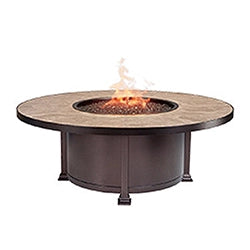
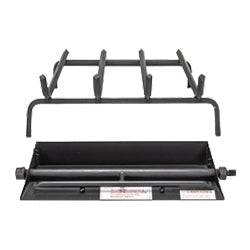
The Round Drop-In with Spark Ignition is easy to install, delivered with all the parts you need for a beautiful, dependable flame in your pit.
Assembling the Drop-In Fire Pit Kit
Once your base is prepped and level, it’s time for the real fun. Whether your kit is propane or natural gas, the assembly follows a fairly predictable path.
What’s Usually Included:
- Burner + pan combo
- Key valve and 3"–12" key
- Flex hose (whistle-free, stainless steel)
- Elbow fittings and adapters
- Air mixer (propane kits only)
Assembly Flow:
- Wrap pipe threads (NPT only) with yellow gas-rated Teflon tape.
- Attach the propane air mixer to the burner pan (for propane).
- Connect the flex line to the air mixer or straight to the burner (for natural gas).
- Install street elbow and valve components with proper sealing.
- Hand-tighten, then wrench snug—but don’t overtighten.
At this point, everything should be connected except the propane tank or main gas line. We’ll get to that soon.
Installing the Bowl or Burner Pan
This is where your drop-in fire pit kit truly becomes the centerpiece of your outdoor space. If your burner is already integrated into a pan (most kits are), you’ll be dropping it right into your enclosure or tabletop cutout.
Drop-In Installation Tips:
- Measure the opening before you start. Your drop-in pan should sit flush or just slightly recessed.
- Dry fit the burner pan first to check alignment and fit—especially important for ignition systems and valve access.
- If using a match light system, make sure the key valve location is easily accessible from outside the enclosure.
- For spark ignition systems, ensure your igniter’s wiring and module are protected and routed correctly.
Pro tip: Never place fire glass or rock until your burner is tested and the gas line is confirmed leak-free. Media can hide problems you won’t want to dig through later.

Connecting Your Fire Pit Kit to the Gas Source
Now the part where things get serious: hooking your fire pit up to live gas. Whether you’re using natural gas or propane, this step must be handled with care—and in some cases, by a certified pro. And given that you’re literally playing with fire, make sure you follow this fire pit safety checklist before you ignite it.
If You’re Using Natural Gas:
- Connect the flex line from the burner system to the main gas stub out.
- Use a key valve to regulate the flow, typically installed into the side of the fire pit structure.
- Check your local code. Some require a shut-off valve within a specific distance of the burner.
If You’re Using Propane (With a Tank):
- Connect the flex line to the air mixer and burner as per the kit diagram.
- Attach a CSA-approved regulator to your propane tank.
- Use a 20 lb. or larger propane tank rated for outdoor appliance use.
- Ensure your air mixer intake remains unobstructed. This is what allows proper combustion.
Safety Check: Leak Testing
Before you light anything:
- Mix up a spray bottle of soapy water (dish soap works great).
- Turn the gas on briefly and spray all connections.
- Watch for bubbles. If they appear, shut everything down and tighten the fittings.
- Never use open flame to test for leaks.
If everything’s secure and bubble-free, you’re ready to light things up.
Fire Pit Ventilation: The Most Overlooked Step
Proper ventilation isn’t just important. It’s critical. Your fire pit structure must have vents for safety, burner performance, and air circulation.
Why You Need It:
- Prevents gas build-up in enclosed spaces (major hazard)
- Helps maintain even airflow for combustion
- Keeps ignition systems from overheating
- Allows moisture and heat to escape
Vent Requirements:
| Gas Type | Vent Needed | Placement |
|---|---|---|
| Propane | Yes (mandatory) | Opposing sides, low and high |
| Natural Gas | Yes (strongly recommended) | Opposing sides, mid-level |
Minimum venting: Two openings, each at least 18 square inches, placed on opposite sides of the enclosure. Do not block these with stone, decorative panels, or cushions.

Adding Fire Media
Time to make it beautiful. Whether you’re using fire glass, lava rock, or ceramic logs, adding the right fire media is the final visual layer to your fire pit. It plays a functional role, too.
Fire Media Options:
- Lava Rock: Rustic, lightweight, inexpensive
- Fire Glass: Modern, reflective, color variety, better flame visibility
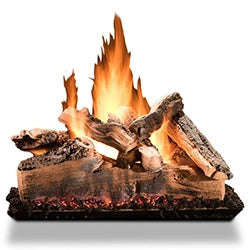
- Ceramic Logs or Stones: Designed for vented burners, mimics natural fire
- Fire Balls: Sculptural and minimalist aesthetic
Tips for Placement:
- Don’t bury the burner—leave at least ½ inch clearance above the burner ports.
- Spread evenly, keeping air mixer orignition points accessible.
- For spark igniters, leave a visual cue so you know where to aim your lighter if needed.
- Clean your media before placing it—dust or packaging residue can burn off unpleasantly.
Safety note: Use only fire-rated media approved for your burner system. Regular glass or stones can crack, shatter, or explode under high heat.
Ignition and Flame Adjustment
You’ve placed the burner, connected the gas, installed the media… now it’s time for the moment of truth: ignition.
Match Light Systems:
- Turn the gas key slightly open. You should hear a gentle hiss.
- Use a long lighter or matchstick over the burner pan.
- Light one edge and let the flame spread naturally.
- Adjust flame height with the key valve.
Match-lit systems are simple, durable, and common in DIY installations. Just don’t crank the valve open all the way—high pressure can lift the flame too high or blow it out.
Spark Ignition Systems:
- Ensure your power source is ready (AA battery or wired connection).
- Push and hold the igniter button while turning on the gas valve.
- Listen for the click and watch for the arc to ignite the gas.
- If it doesn’t light within 5 seconds, release and wait 30 seconds before retrying.
Some systems have electronic shut-off timers or thermocouples. Always refer to your kit’s manual for the right ignition sequence.

Adjusting the Flame
You want a clean, dancing flame—not a roaring torch or a whispery flicker.
Perfect Flame Checklist:
- Bright yellow or soft orange color
- Flame height 6–12 inches above the media
- No sputtering or “burping” sounds
- Even distribution across the burner
If the flame is weak:
- Check gas pressure and connection fittings.
- For propane, ensure the air mixer isn’t clogged.
- Make sure the media isn’t covering burner ports or ignition elements.
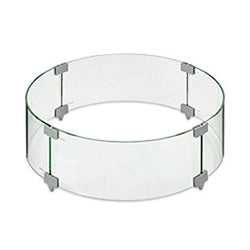
Pro tip: Windy night? Use a glass wind guard or strategically place furniture to block crosswinds without smothering airflow.

Fire Pit Finishing Touches: Trim, Surrounds, and Furniture
Your fire pit works—but now let’s make it look finished.
Trim and Top Finishes:
- Drop-in fire pit rings often sit in metal or stone surrounds. Choose one that fits snugly and resists rust.
- Use concrete pavers, tile, or stacked stone to finish around the pan.
- Keep clearance zones of 2–4 inches from any combustible material.
Surrounding Furniture Ideas:
- Deep-seated sectional with water-resistant cushions
- Low-profile Adirondack chairs for a cozy ring
- Outdoor coffee table nearby for snacks and drinks
- Fire pit tool storage box or built-in bench with hidden storage
Design with traffic flow in mind: you want people to enjoy the flame without stepping over it every five minutes.
Routine Maintenance and Troubleshooting
A well-installed fire pit is low-maintenance—but that doesn’t mean no maintenance.
| Weekly Care | Monthly Care |
|---|---|
| Wipe burner pan and trim clean | Vacuum or scoop out soot and ash buildup |
| Remove debris, insects, or leaves | Wipe down fire glass or lava rock with warm water |
| Inspect gas connections for visible wear or corrosion | Check for media shifts—burners should remain uncovered |

Troubleshooting Common Fire Pit Kit Issues
It can be incredibly frustrating when you follow all of the manual’s instructions and something still doesn’t quite work with your drop-in fire pit kit. There are a handful of common issues, and here are some steps you can take to try to fix them.
| Issue | Cause | Fix |
|---|---|---|
| Weak flame | Low pressure or clogged burner | Clean burner, check regulator |
| Uneven flame | Blocked ports or poor airflow | Redistribute media, inspect venting |
| Igniter won’t spark | Dead battery or corroded wire | Replace battery, check igniter leads |
| Excessive soot | Poor air-to-gas mix (usually propane) | Clean air mixer, check for blockages |
Always shut off the gas* before servicing. If anything smells off—or flames behave unpredictably—call a licensed technician.
FAQs for First-Time Installers
How long does it take to install a drop-in fire pit kit?
If your base is ready, most installs take 2–4 hours. Give yourself a full afternoon, especially if it’s your first time.
Do I need a professional to hook up the gas?
For propane with a tank, most homeowners do it themselves. For natural gas connections, it’s strongly recommended (and often required) to hire a licensed plumber or gas technician.
What size burner should I choose for my pit?
Burner size should be 6–8 inches smaller than your pan or enclosure. This ensures proper spacing for flames and airflow.
Can I put the fire glass right on the burner?
Yes, but keep it 1–2 inches deep, and never block the ignition ports or air mixer intake (propane).
Can I move a fire pit once it’s installed?
Only if you’re using a portable enclosure or frame. Most built-in pits are meant to stay put once connected.

Final Take: Why a DIY Drop-In Fire Pit Kit Is Worth It
I’ll be honest. The first time I saw a DIY gas fire pit kit, I thought: “This can’t be that easy.” And honestly, there were some tricky parts. But it was doable, and installing your own drop-in kit is a great way to save cash on your fire pit.
And once your fire pit is finished, you won’t just have a beautiful fire pit. It’ll be a backyard focal point that you built myself, and maybe you’ll have learned a few new handy construction tricks.
If you’re the kind of person who likes checking things off a list, solving puzzles, and standing back at the end of the day to say “I built that”… a drop-in fire pit kit is one of the best DIY projects you’ll ever tackle.
It’s a weekend that turns into years of memories.
So go ahead. Drop it in. Fire it up. And light up your backyard, your evenings, and your summer.